
The January 2011 Daring Bakers’ challenge was hosted by Astheroshe of the blog accro. She chose to challenge everyone to make a Biscuit Joconde Imprime to wrap around an Entremets dessert.
"A joconde imprime (French Baking term) is a decorative design baked into a light sponge cake providing an elegant finish to desserts/torts/entremets/ formed in ring molds. A joconde batter is used because it bakes into a moist, flexible cake. The cake batter may be tinted or marbleized for a further decorative effect. This Joconde/spongecake requires attentive baking so that it remains flexible to easily conform to the molds. If under baked it will stick to the baking mat. It over baked it will dry out and crack. Once cooled, the sponge may be cut into strips to line any shape ring mold.
Entremets (French baking term)- an ornate dessert with many different layers of cake and pastry creams in a mold, usually served cold. Think Trifle in a mold vs. a glass bowl."
Entremets (French baking term)- an ornate dessert with many different layers of cake and pastry creams in a mold, usually served cold. Think Trifle in a mold vs. a glass bowl."
This challenge was tough but came out nicely. The first thing challenging was to find a mould which fit into my freezer. Luckily there is this new baking shop in Dresden, where I found the mould and the recommended silpat mat and pastry combs - I don't know how I would have survived this challenge without them ...
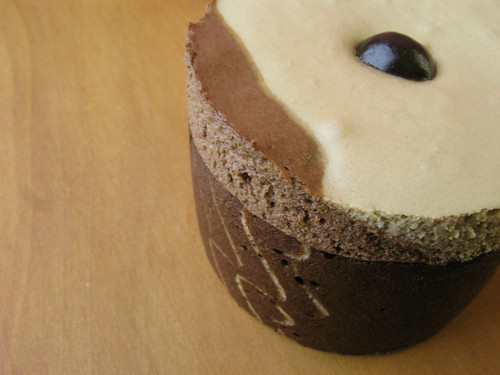
And as nothing is as tempting and delicious as a combination of chocolate and coffee, I choose a quick mousse au chocolat and coffee mousse as my fillings - which was really clever because I could use all my leftover egg yolks.

3C*-Entrement (*Cocoa, Chocolate, Coffee)
Joconde Sponge
for a 33 x 46 cm jelly roll pan, I halved the recipe
- 85g almond flour/meal - *You can also use hazelnut flour, just omit the butter
- 75g confectioners' (icing) sugar
- 25g cake flour
- 3 large eggs
- 3 large egg whites
- 210g white granulated sugar or superfine (caster) sugar
- 30g unsalted butter, melted
In a clean mixing bowl whip the egg whites and white granulated sugar to firm, glossy peeks. Reserve in a separate clean bowl to use later. Sift almond flour, confectioner’s sugar, cake flour. (This can be done into your dirty egg white bowl). On medium speed, add the eggs a little at a time. Mix well after each addition. Mix until smooth and light. (If using a stand mixer use blade attachment. If hand held a whisk attachment is fine, or by hand. ) Fold in one third reserved whipped egg whites to almond mixture to lighten the batter. Fold in remaining whipped egg whites. Do not over mix. Fold in melted butter. Reserve batter to be used later.
Patterned Joconde-Décor Paste
for a 33 x 46 cm jelly roll pan - I halved that too
- 200g unsalted butter, softened
- 200g Confectioners' (icing) sugar
- 7 large egg whites
- 170g cake flour
- 60 g cocoa powder
Sift the flour and cocoa powder together. Cream butter and sugar until light and fluffy (use stand mixer with blade, hand held mixer, or by hand) Gradually add egg whites. Beat continuously. Fold in sifted flour-cocoa-mixture.
Spread a thin even layer of décor paste approximately 1/4 inch (5 millimeter) thick onto silicone baking mat with a spatula, or flat knife. Place mat on an upside down baking sheet. The upside down sheet makes spreading easier with no lip from the pan. Pattern the décor paste – You can make horizontal /vertical lines using a knife, spatula, cake/pastry comb. Squiggles with your fingers, zig zags, wood grains or use a piping bag. Slide the baking sheet with paste into the freezer. Freeze hard. Approx 15 minutes. Remove from freezer. Quickly pour the Joconde batter over the design. Spread evenly to completely cover the pattern of the Décor paste.
Bake at 475ºF /250ºC until the joconde bounces back when slightly pressed, approx. 15 minutes. You can bake it as is on the upside down pan. Yes, it is a very quick bake, so watch carefully (it took me only 10 minutes). Cool. Do not leave too long, or you will have difficulty removing it from mat.Flip cooled cake on to a powdered sugared parchment paper. Remove silpat. Cake should be right side up, and pattern showing.
Bake at 475ºF /250ºC until the joconde bounces back when slightly pressed, approx. 15 minutes. You can bake it as is on the upside down pan. Yes, it is a very quick bake, so watch carefully (it took me only 10 minutes). Cool. Do not leave too long, or you will have difficulty removing it from mat.Flip cooled cake on to a powdered sugared parchment paper. Remove silpat. Cake should be right side up, and pattern showing.
Cut in desired shape. Press the cake stripes inside of the mold, decorative side facing out. Once wrapped inside the mold, overlap your ends slightly. You want your Joconde to fit very tightly pressed up to the sides of the mold. Then gently push and press the ends to meet together to make a seamless cake. The cake is very flexible so you can push it into place. You can use more than one piece to “wrap “your mold, if one cut piece is not long enough.
I used my dessert rings/mould which I lined with stripes of silpat mat (I bought a second which was cut in different shapes for all my baking and dessert moulds). Fill with the mousse (recipes below) and refridgerate for at least two hours.
Quick mousse au chocolat
- 100g milk chocolate (with cocoa nibs)
- 75 g semi or bittersweet chocolate*
- 2 egg yolks
- 200 ml heavy cream
*You can use all kinds of chocolate 'leftovers', eg those from christmas. If only using bitter or semisweet chocolate, you have to add some sugar
Melt the chocolate in a water bath. Let cool and add the egg yolks, stirring continuously. Beat the cream until stiff, combine with the chocolate mixture.
Coffee mousse
- chocolate covered coffee beans (for decoration)
- 2 teaspoons instant espresso
- 1 tablespoon Kalua (coffee liquer)
- 20 g sugar
- 200 ml heavy cream
- 125 ml water
- 2 egg yolks
- 4 sheets of gelatin
Soak the gelatin sheets in cold water until soft and remove excess water. In a sauce pan, mix water and sugar. Heat until the mixture boils and add the instant espresso. Remove from heat and add Kalua and the gelatine sheets. Stirr until completely dissolved. Let cool. Beat the cream until stiff. Beat the egg yolks into the cooled coffee-mixture and combine with the cream.
Keine Kommentare:
Kommentar veröffentlichen